 |
| rattle rattle |
 |
| Back |
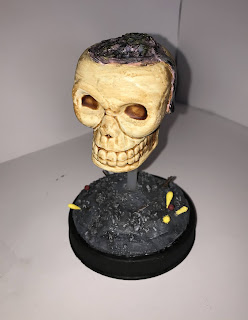
Anyway, let’s get to the how. You’ll first need your skull- they’re pretty easy to find and very cheap if you look around in October. Sizes may vary but the idea is the same. I also used: tinfoil, a lid for the base, hot glue, dollar store foam board, push pins, and as always your dollar store paints, knives, etc.
My skull came without the top portion of the...well skull. You may need to cut that out yourself OUR skip the oozing brains entirely. It’s your mini. That would also cut down the crafting time quite a bit. But if you like the brains being exposed, stick a piece of balled up tinfoil in and hot glue it. Fiddle with positioning until you’re happy.
Next cut a small hole in the bottom for your glue stick stand and jam it in. I personally sanded the skull a bit so the primer would stick better. You could always leave it unpainted but my skull was snow-white and I wanted a more yellowed look.
Hot glue a bit over the tinfoil for the oozing brains but leave most of the tinfoil uncovered- it gives a great texture.
For the base I used 3 layers of thin foam board that I carved with my craft knife into stone, painted the lid black, attached the skull and stuck a couple push pins into the stone to represent plants.
That’s pretty much it! Paint it to your liking or need and enjoy your belated Halloween mini!

Comments
Post a Comment